DIY roof replacement (part 1)
I’ve been saddled with a roofing job at my new home.
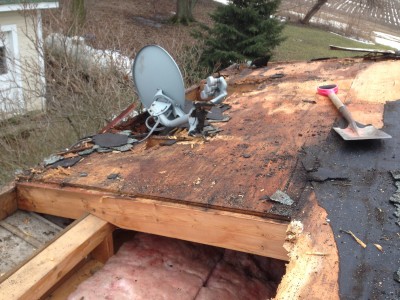
Three layers of tarps conceal the abhorrent condition of the kitchen roof. My family is going to buy this home, a 1901 Indiana farmhouse. I’m told that the roof’s condition prevents me closing a loan for the property. If you live in the Northern Hemisphere, you’ll have noticed the temperature out side in January. My roof replacement is happening none the less, so we can close on the house as soon as possible.
My DIY roof replacement
1. Assess the roof condition:
This is the easy part of the roof replacement this time. I have about 600 square feet of roof that is falling apart. The eves are caving in on the soffit and many shingles have simply rotted off. There are 3 layers of tarps that have been added over the last few years as a temporary solution, but their time has come!
Diagnosis: Full replacement of shingles and sheathing.
2. Buy materials:
My wife and I have decided to go with a standard, economy 3-tab ebony shingle. 19 packs of shingles will cover the roof. I bought enough 15 pound tar paper to cover the roof twice (which is recommended by the manufacturers of tar paper). I also bought new drip edge and step flashing with roofing adhesive, staples, and 1 1/4″ roofing nails. For sheathing I bought 21 sheets of 5/8″ sheathing grade plywood. I also bought 12′ of ridge vent, as the old roof had no vents installed. The last thing I bought is a 50 Pack of Hook Blades for Roofing for my utility knife. The only thing I had already was a big box of 2 1/2″ nails which I’m using to fix the sheathing to the rafters.
3. Demolition of old roof / shingle removal

Removing the rotten shingles and sheathing was only half the fun in this DIY roof replacement.
I used a few tools to remove the old shingles and sheathing. First is my trusty flat Square Edged Shovel, I also have a small Flat Bar
, a Claw Hammer
, and a Demolition Tool
hammer/fubar-like utility tool.
I rented an 8-yard dumpster from a local roll-off service company to put all of the old roofing into.
I mostly used the shovel to quickly scrape and remove the shingles and old tar paper, all the time trying to avoid the most rotten spots on the roof for fear of falling through. Once the shingles were removed, I used the flat bar and utility hammer to remove the old sheathing. Surprisingly, the rafters were in remarkable condition, and only the fascia boards needed replacing.
On another note, I realized the old roof is built on a quazi-24″ on center rafter layout. I’m glad I bought the 5/8″ sheathing and not 1/2″, because I’d have had to return it.
Make sure to remove all of the old nails and flashing to be replaced.
4. Repair any broken and rotten rafters
Like I mentioned, I had a couple of rotted fascia boards, which I replaced with some 2×6″s that I had from other projects. This was a bit of a pain in the behind because of the fascia and soffit that was attached to it. I had to remove all of that before replacing the fascia board.
Another thing I had to replace was a couple of supporting boards at the point where my electrical wires go into the house. There is a 2″ metal pipe conduit supported by 2 2×6″ pieces of wood.
5. Replace the sheathing
Be sure to use the largest pieces of sheathing possible, and stagger the sheathing boards so the edges of one board do not line up with the edges of the next board. You don’t want the edges of two adjacent pieces on one rafter. I used 1 nail every 6 or so inches on the edges, and 4-5 nails in the center of the boards on middle rafters. This is 2-3 times more nails than were used on the old roof. It is noticeably more secure than the old roof, and I’m very pleased with it.
I chose to do a full replacement of the old sheathing for a few reasons. First was a lot of rotten spots. Second was that the whole roof was pretty spongy. Lastly, the roof was pieced together with scraps on the back side. There were small strips of sheathing instead of large pieces, adding to the instability of the overall structure.
6. Tar paper and drip edge

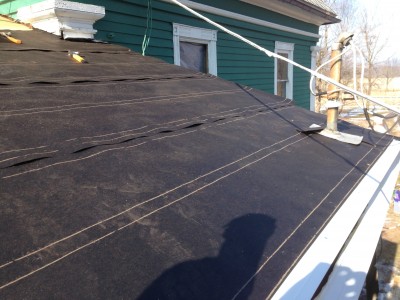
Tar paper and drip edge is installed, but with bad weather in the forecast… time for a bit of a break.
Everything I’ve read says to do two layers of tar paper, so that’s exactly what I did. I got a hammer stapler to make the job go smoother, and am I ever glad I did! With two layers of paper, I went through a couple thousand staples and the other stapler I have would have been a real chore to use that much. With the help of a buddy who used to work with a roofing company, I did the first layer of paper, and then the drip edge at the bottom of the roof. Then I added the second layer of tar paper. The bottom row of tar paper gets installed first, and it overlaps about 90% of the drip edge so any watershed will go over the drip edge, and not under it. Once the second layer was installed, the drip edge on the angled, outer edge of the roof was installed over both layers of tar paper. This was the last part I’ve finished so far on the roof. The drip edge over the top of both layers on the outer part of the roof keeps the edges of the tar paper from catching wind. Another thing I did to combat the wind from damaging the roof at this point was to add extra staples to the bottom edge of each row of tar paper.
Right now, winter is prevailing over me finishing the roof, and I don’t want to put shingles on a roof that is wet.
Part 2 of my DIY roof replacement will come after the next melt. We had freezing rain this morning, with cold weather in the forecast this weekend!
Pingback:DIY Roof Replacement (Part 2) - Handy Father
Pingback:How to replace water damaged plaster (Pantry Remodel Part 1) - Handy Father