Replace your own alternator: How-to
 If you’re reading a how-to replace your own alternator
 article, it can only mean one thing. You’ve had a bit of bad luck with your vehicle.
If you’re looking to replace your own alternator, the story may go something like this. It’s Thanksgiving, and you’re about to drive 25 miles to your family Thanksgiving dinner, when half-way there the battery light in your vehicle comes on, and less than a mile later, the gauges and lights go out. You have a serious problem.
Luckily, a gas station is within reach, so on no battery power, you limp in, and get a jump from a friend or passer-by.
Alternators Cheap | Alternator | DIY Alternator Replacement
If like me you have assumed that getting a jump will take care of the problem, go ahead and continue on your journey. Too bad though, because two or three miles down the road and the battery light will be on again. Yes sir, the alternator has been confirmed. Time of death… Noon (coincidentally the time Thanksgiving dinner was to be served).
After two jumps we were able to get home. Auto parts stores aren’t open on national holidays, so I spent part of that evening researching parts for my vehicle. I went to the national chain store’s website that are near my location and found suitable replacement alternators and their prices, crosschecking the proximity to Starbucks, and made my selection.
Alternators Cheap | Alternator | DIY Alternator Replacement
Replace your own alternator
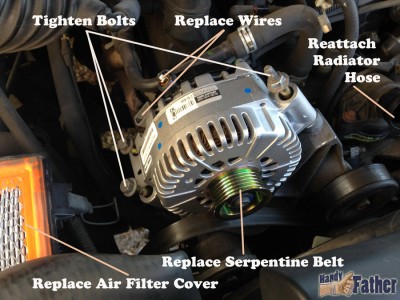
The first thing you’ll have to do is to locate your alternator in the engine compartment. Luckily, I have a 2002 Ford Explorer. The alternator is visible upon opening the hood. To remove my old alternator, all that was required was the loosening of three bolts which held it in place, a nut that held the supply line for outgoing power, and a small electrical clip. To gain access to these bolts, I removed one end of a hose from my radiator as well as the cover for my air filter.
With the old alternator out, I brought it in to the local auto parts store, as there was a core charge (refund for giving them your old unit), and bought a middle-of-the-road remanufactured alternator. It came with a limited lifetime warranty and after the core charge cost me about $140.00.
 Reinstalling the new alternator is as simple as replacing the three bolts, and reattaching the wires, one by clip, and one by a small nut. The hardest part is reattaching the serpentine belt which in my Explorer, doesn’t have a tension spring access like a nut or notch to help me turn it. I ended up manually pushing the tensioning spring with the back end of my breaker bar until I could slip the belt over the alternator pulley into place.
After the belt was in place, I replaced the air filter cover and the radiator hose.
The only thing left is to give the vehicle a jump to recharge the drained battery.
This DIY replace your own alternator project is complete and you’ve saved yourself up to $500.
Pingback:Replace your own alternator: How-to - Vehicular